
04/12/2020: Neue Tracker FW 1.67 am Server – FW_Doku_version_167
Instruktionen und Files zum Flashen der Firmware v 1.67 in Flashing_Firmware.zip auf der FTP-Seite
(User: 158873ftp3 / lora12345 )
Achtung – unser WebHosting Provider hat leider stillschweigend am 2.Dezember die RSA Certificates von Let’s Encrypt Authority X3 auf R3 umgestellt und die Validierung für den FW-Download funktioniert nun nicht mehr, was zu einem ‚Connection Refused‘ Error führt und den automatischen FW-Download abbricht.
Ich habe eine neue FW-Version 1.67 mit neuem Certificate gebaut, die allerdings über OTA oder USB installiert werden muss. Weitere FirmwareDownloads können dann wieder automatisch vom Server durchgeführt werden. – Sorry!
ältere Versionen:
01/12/2020: Tracker FW 1.66 am Server – FW_Doku_166
12/05/2020: FW 1.61
Software Gateway
Es tut sich einiges in der Community und es haben sich einige interessante Projekte entwickelt.
- https://github.com/peterus/LoRa_APRS_iGate auf ESP32
- https://github.com/tomelec Raspberry Pi LoRa KISS TNC mit APRX
- http://www.iot4pi.com/de/raspberry-pi-projekte-software/lora-aprs-gateway/ Sascha’s iot4pi LoRa-APRS-iGate
- https://github.com/begass/LoraAPRSGW Sascha hat uns dankenswerterweise den LoRa-APRS Gateway Code zur Verfügung gestellt!
Sascha’s iot4pi war die ursprüngliche Version, die seit mehreren Jahren erfolgreich im Einsatz ist. Wir haben für den Rasperry Pi ZeroW (und Pi 3 (+) ) ein SD-Karten Image mit aktueller Kernel Version erstellt und Sascha’s Gateway-SW um ein paar Monitoring-Scripts erweitert. Außerdem gibts in der letzten Version eine Anbindung an den GPSD, um die GPS-Koordinaten in der Konfig je nach Standort beim Start zu aktualisieren.
Das Zip Archiv hat ca 1.1GB und wurde von einem 4GB SD-Karten Image erstellt. (Download am Besten über Google Chrome)
Download GW Version:
Andreas, OE5PON, hat das Image überarbeitet. Vielen Dank für deine Hilfe, Andreas!
zu finden auf unserer FTP-Seite: FTP ftp://www.lora-aprs.at (User: 158873ftp3 / lora12345 )
201215-Buster-systemd-2GB.zip (GW-Image Letztversion 2020 Dec 15)
GW-Image_20200819_Buster.rar (GW-Image 2020 Aug 19)
ältere Versionen:
GW_gpsd_20200505_4GaP ( ab 4 GB SD)
20190623 (mit BME Sensor) (16GB-uSD) : https://www.dropbox.com/s/wi60n330z8wo6d3/GW-Image_20190623onw.zip?dl=0
Installation:
1. Download
2. entpacken (unzip)
3. Image auf GB SD-Karte Kopieren (i.e. mit Win32DiskImager)
4. du solltest dann damit vom Raspberry Zero W oder Pi 3 booten können ( Login: pi/raspberry )
5. WLAN Zugang einrichten um das GW ans Netz zu hängen
verschiedene Möglichkeiten:
- am Pi 3 über Ethernet Kabel ( DHCP ist aktiv und er sollte sich eine IP aus deinem NW zuweisen lassen)
- am Pi Zero W (über optionalen USB-Ethernet Kabel Adapter)
- oder altmodisch über Konsole (HDMI) & USB Tastatur
- wenn du in der Shell bist, kannst du über sudo raspi-config deine WLAN konfig durchführen…
- oder bei neueren Images die editierte wpa.suplicant.conf ins Boot-Verzeichnis kopieren.
Die Datei wpa_suplicant.conf kann mit SSID und PSK editiert werden, und einfach in das Root der SD Karte kopiert werden. Das wird beim Booten in das /etc/wpa_supplicant/ übernommen. Muster File liegt auch am FTP Server.
....  oder für ältere GW-Image Versionen:
Falls ein Linux system mit SD-Karten Leser zur Verfügung steht, kann das Image auch gemounted werden
 und das File etc/wpa_suplicant/wpa_suplicant.conf direkt mit den eigenen WLAN (SSID & Passwd) ergänzt werden.
## nach Einschieben der SD-Karte wird das Filesystem gemounted:
/dev/mmcblk0p1 43539 22499 21040 52% /media/bernd/boot
/dev/mmcblk0p2 15240048 1905136 12683112 14% /media/bernd/rootfs

## ins Verzeichnis wechseln ...
$ df
$ cd /media/bernd/rootfs
$ ls
$ cd etc/wpa_supplicant/
$ ls


##  das File editieren ... (es kann auch ein anderer Editor verwendet werden zB: nano(1) )
$ sudo vi wpa_supplicant.conf

ctrl_interface=DIR=/var/run/wpa_supplicant GROUP=netdev
update_config=1
country=AT

network={
ssid="HUAWEI-3A96-2.4G"
psk="....password......"
}

                                      ##  eigenes WLAN hinzufügen

# add your  WLAN parameters here ....   SSID and Password
network={
ssid="NGbg24"
psk="....password......"
}

##  Abspeichern ....

##  zurück ins HOME Verzeichnis und unmount der SD-Karten Filesysteme
$ cd
$ umount /media/bernd/rootfs
$ df
$ umount /media/bernd/boot
Das modifizierte Image kann jetzt zum Booten verwendet werden. Der Raspi sollte sich im eigenen WLAN anmelden. DHCP und ssh Server sind aktiv. Die neu vergebene IP Addresse lässt sich am WLAN-Router (DHCP.log) finden, bzw, kann auch am Display angezeigt werden.
6. Wenn die NW/WLAN Konfig erledigt ist, bitte im Verzeichnis /home/pi/iot4pi das Konfigurationsfile
APRS.conf editieren und deine Parameter einstellen.
falls die GPSD-Version verwendet wird, sollten die Parameter im File APRS.conf.GPS_in geändert werden. Daraus wird dann APRS.conf.GPS (mit aktuellen GPS-Daten erzeugt, das dann auf ‚APRS.conf‘ symbolisch gelinkt ist. Die GW-Software startet dann mit den aktualisierten GPS-Daten, die vom ‚gpsd‘ empfangen wurden.
- Call des Gateways,
- dein APRS- Passcode (Generator: http://www.dstarcomms.com/aprs/index.php/passcode)
- Bakentext
- Latitude
- Longitude
Die GW Software ist so eingestellt, dass sie nach dem Boot die NW-Konfig (IP Addresse) anzeigt, und wenn die APRS-Server erreichbar sind, wird die GW-Software (Sascha’s iot4pi-Version) gestartet.
Über ’sudo raspi-config‘ sollten noch der Hostname, Password und andere Parameter wie Partition-Size/Filesystem, etc … angepasst werden.
Zusätzlich besteht die Möglichkeit die APRS.conf Datei über einen Script mit den aktuellen Positionsdaten über GPSD upzudaten, was bei öfterem Standortwechsel des GW ( z.B. bei Einsatz bei Fielddays oder am Parkplatz im Auto) von Vorteil ist. Es muss somit nicht jedesmal mühsam das APRS.conf File editiert werden …
Update 05/05/2020:
Startup – Interaktion mit GPSD zum automatischen Update der Positionsdaten im APRS.conf File.
Es kann jetzt beim Start des Gateways über TastenDruck ein automatisches Update der Positionsdaten im APRS.conf File durchgeführt werden. Somit entfällt das lästige Editieren der Position (LATITUDE/LONGITUDE) in der Konfig, falls das Gateway mal mit Hotspot zum Fieldday, Wandern, Skifahren, Laufen oder Urlaub mitgenommen wird.
Die GPS-Daten werden über den GPS-Daemon im OS gelesen. Es können unterschiedliche GPS-Empfänger (USB/Serial/Bluetooth/GPS vom Mobiltelefon über Shared GPS App und NW-Verbindung) eingebunden werden.
Das Ganze wurde in eine neue Startup Routine verpackt, die beim Start/Boot ausgeführt wird. Die Konfig muss etwas angepasst werden …
– Tar Archiv mit neuer Statup-Routine show_startup_200505.tar.gz
(download über wget https://www.lora-aprs.at/wp-content/uploads/2020/05/show_startup_200505.tar.gz)
Beschreibung/README
startup_src $ more README
******************************************************
* *
* New Startup procedure with *
* – Verification of Network Connectivity and *
* – Interaction with GPS-Service Daemon (gpsd) *
* *
* *
* https/www.lora-aprs.at Bernd Gasser/OE1ACM *
******************************************************Description:
when booting the RasPI the start.sh scrip gets executed thru cron.
(@reboot /home/pi/iot4pi/start.sh)
(see start.sh script below)The start.sh calls a little program ’show_startup‘ that opens
the Oled 96 Display and reads buttons.
The initial purpose of this ’show_startup‘ was to check
network-connectivity, check wheter WAN connection to APRS-IS
servers can be connected and show the IP-Addresses that were
assigned by DHCP – for easy access to the OS (i.e. thru ssh)What is new now?
—————-If the Gateway isn’t always operatedat the same location ( i.e.
placing the GW in car with hotspot on parking area while walking,
skiiing, cycling, etc … , it was quite annoying to manually
update it’s position LAT/LONG in the APRS.conf file.For updating the current position in the APRS.conf file we now
added a feature during startup to interact with the GPS-Daemon
‚gpsd‘ and automatically replace location (LAT/LON) with current
position returned from gpsd.This feature is activated by holding any of the buttons during
startup while Network interfaces are searched and tested.A'(GPS)‘ marker will appear in upper left corner of the screen,
indicating that ‚gpsd‘ gets contacted for current position.gpsd in turn will read it’s data from any GPS device connected
either thru Serial, USB, Bluetooth or any network – TCP/IP
connection. I have tested Bluetooth GPS from Garmin and also
sharing GPS data from mobile thru the ‚Share GPS“ App (on my Samsung S9)if Bluetooth is used it is required to pair the GPS and configure SPP
and add the device to gpsd … this can be added to the startup script
as shown below…
proper connectivity can be checked and verified by ‚gpsmon’….
gpsd is quite well documented so I don’t want to go into detailHow do we replace current position in APRS.conf?
Once we activated the automatic position update by holding a
button during Interface scan in startup, we query ‚gpsd‘ for GPS-Data
and once we receive a valid position, we’ll exchange a ‚placeholder‘
in the file ‚APRS.conf.GPS_in‘ and create the new ‚APRS.conf.GPS‘ file
with updated position Data (LAT/LON).Note, if retrieving GPS-data from ‚gpsd‘ fails, the old, last
configuration will be kept. Also if no key/button is pressed during
startup, we’ll not do any update and use prvious config.btw, updating position is done by the streaming editor ’sed‘
with the foillowing command in the sedfile:s/LATITUDE:________/LATITUDE:4812.91N/g
s/LONGITUDE:_________/LONGITUDE:01627.25E/g
so please don’t remove the placeholder for the position when editing
APRS.conf.in.So I’d suggest to put your own current config into the ‚APRS.conf.in‘
file that is used as basis for creating the final APRS.conf with
current position updated.
to keep multiple configurations in parallel you can create
symbolic link to the configuration you want to use.example ln -s APRS.conf.GPS APRS.conf
lrwxrwxrwx 1 pi pi 13 May 4 10:35 APRS.conf -> APRS.conf.GPS
-rw-r–r– 1 pi pi 2140 May 4 12:20 APRS.conf.GPS
-rwxr-xr-x 1 pi pi 2140 May 4 10:58 APRS.conf.GPS_inabove will activate the automatically updated APRS.conf.GPS for
Sascha’s (iot4pi-GW) Software to startup with the Gateway-Software.using symlinks may help to keep multiple configs
Installation:
————-– create a backup/copy of your current configuration
in /home/pi/iot4pi– download archive with new startup
– replace the current ’show_startup‘ binary with the one
from downloaded archive.i@LoRaGW_27:~/iot4pi $ mv show_startup show_startup.old
pi@LoRaGW_27:~/iot4pi $ cp ../startup_src/show_startup .– copy your current APRS.conf to APRS.conf.GPS_in and add the
placeholders:LATITUDE:________
LONGITUDE:_________where you want the position be filled by the automatic
update.– create the symbolic link from APRS.conf.GPS to APRS.conf
to use the automatically updated file as input for the GW-SW# ln -s APRS.conf.GPS APRS.conf
– setup gpsd and verify gpsd
there is plenty of information published
https://gpsd.gitlab.io/gpsd/gpsd.html
https://gpsd.gitlab.io/gpsd/troubleshooting.htmluse gpsmon / gpsdctl to verify proper gpsd config
– verification
you can dry-run to verify …
– stop current GW-SW
sudo pkill iot
– from iot4pi subdirectory start sudo ./show_startup
Oled will list interfaces and IP … hold any button …Oled will show on top:
(GPS) Interfaces
gpsd will be queried for GPS-data and will contact configured
GPS-RX …. when successful it shows LAT/LON Position data
on Oled and will create ’sedfile‘ with streaming editor commands
to replace placeholder in APRS.conf.GPS_in and write to
APRS.conf.GPS (that is linked to APRS.conf)– maybe verify that GPS-RX are properly configured and started
during boot. when needed you can add lines to the start.sh
script that gets started by cron.below is a sample of my commands to add a network-shared GPS from
my mobile via TCP-connection to port 2947 (from Shared GPS App)or the other Line shows the connection to an old Garmin Bluetooth
GPS. I did pair and trust the device via bluetoothctl before and
just do the rfcomm binding to the address to create a serial outgoing
connection via bluetooth to the GPS-RX. I then added the device
rfcomm0 to the device list for gpsd.~/iot4pi $ more start.sh
#—- start.sh ——————————————-
#!/bin/sh
Pfad=“/home/pi/iot4pi/“
echo „Waiting to wake up…“
cd $Pfad# Starting up gpsd and add device i.e. Shared GPS from mobile
#sudo gpsdctl add tcp://192.168.2.102:2947# Bluetooth Garmin
sudo rfcomm bind 0 00:05:4F:08:B3:F8
sudo gpsdctl add /dev/rfcomm0# startup and check NW Connectivity
./show_startup
ret=$?echo $ret
if [ $ret -ne 5 ]
then
echo „Starting UDP..GW..“sudo $Pfad“iot4pi_LoraGW_01″ >> $Pfad“LogAPRS.txt“
fi
#———————————————————The code is shipped with the archive and can be compiled with supplied makefile.
Several Libraries pthread,gps,oled,wiringPI,etc… will be used but should be included in the image already.It is intended fou our use in the HAM-Radio community only and should not be used for any commercial purpose. If you want to make changes or fix bugs – please feel free to do so but please keep us updated on improvements so a broader audience can benefit.
Have fun!
vy73,
Bernd/OE1ACM
Achtung
bitte überprüfe das APRS.conf (bzw APRS.conf.GPS_in) ob dort auch folgende Parameter gesetzt sind:
#Should Error at start be shownor just be writtten into Log File
ShowErrorAtStart:False

#BME280 if present set TRUE
BME280:TRUE
Ich hab möglicherweise ein altes APRS.conf am Image verwendet … – bitte diese Params ergänzen, sonst meckert die GW-Software …
Es ist leider auch ein überflüssiger Crontab-Eintrag von der Testerei übriggeblieben, der das GW alle zehn Minuten zwischen 0 und 4 Uhr morgens rebootet. Das hat geholfen, den Startup aureichend zu testen, macht aber im täglichen Betrieb keinen Sinn mehr. 😉
Der Crontab kann folgenderweise editiert werden:
# sudo su
# crontab -e
….
# m h  dom mon dow   command
@reboot     /home/pi/iot4pi/start.sh
00,30 *   *   *   *      /home/pi/iot4pi/monitorGW
00,10,20,30,40,50 0,1,2,3 * * * /sbin/shutdown -r 0    # <-- bitte diesen Eintrag entfernen
                                                       # oder auf einen Reboot ändern
File nach Ändering abspeichern...
exit
- fertig
Software Tracker ( aktuell FW 1.67 04/12/2020)
04/12/2020: Neue Tracker FW 1.67 am Server – FW_Doku_version_167
Instruktionen und Files zum Flashen der Firmware v 1.67 in Flashing_Firmware.zip auf der FTP-Seite
(User: 158873ftp3 / lora12345 )
Achtung – unser WebHosting Provider hat leider stillschweigend am 2.Dezember die RSA Certificates von Let’s Encrypt Authority X3 auf R3 umgestellt. Die Validierung für den FW-Download funktioniert nun nicht mehr, was zu einem ‚Connection Refused‘ Error führt und den automatischen FW-Download abbricht.
Ich habe eine neue FW-Version 1.67 mit neuem Certificate gebaut, die allerdings über OTA oder USB installiert werden muss. Weitere FirmwareDownloads können dann wieder automatisch vom Server durchgeführt werden. – Sorry!
Tracker Firmware 1.66 lora-aprs.at
Download Beschreibung: FW_Doku_166
Features im Überblick:
- LoRa-APRS Tracker
- Parameter und Steuerung über Mini-Menü am Tracker oder
- Mini-Web-Interface
- iGate Funktion using Peter’s APRS-IS Lib (nach OE5BPA)
- Konfiguration über Web-Interface
- über mobilen Hotspot
- Alternate Server Umschaltung bei Verbindungsproblem
- Aktuelle Position kann von GPS übernommen werden
- Online Konfiguration über Web-Interface mit WiFi Anbindung
- Mini-Menü am Tracker
- Remote-Steuerung oder Abfragen ( Remote Relais- Steuerung )
- I/O-Expander & BME 280 Sensor Betrieb am verlängerten I2C Bus
- Mini-Messaging über Tracker & Web-Interface
- Sleep-Modus zwischen Aussendungen im Tracker-Betrieb zur Minimierung des Stromverbrauchs
- Automatisches Firmware Update direkt vom Tracker (!!) ( kein Build-Environment mehr nötig für Updates)
- GPS Anzeige, Kompass, MaidenHead Locator, etc ….
- Telnet Server zur Anzeige der empfangenen und gesendeten Daten mit SNR/RSSI
- KISS-Modem Betrieb über USB/Serial (derzeit Testbetrieb)
altere Versionen: FW 1.61 12/05/20:
- Rapport-Abfrage (RSSI/SNR) von Gegenstation ab FW 1.61
- APRS-Paket forwarding über TCP/IP (empfangene Pakete können über TCP geforwarded werden – als Vorbereitung für Einbindung von mehreren LoRa Interfaces in APRX-Gateway-SW oder zum Traffic-Monitoring über Telnet-Verbindung)
- Richtung und Geschwindigkeit in non-compressed APRS Packets
- Remote-Steuerung (4-8 PortRelais Modul über IO-Expander)
- Bug-Fixes …
Die Tracker-Firmware wurde so konzipiert, dass sie sich einfach über unseren Web-Server updaten lässt. Somit können neue Versionen und Features relativ einfach installiert werden.
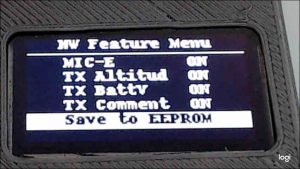
User-spezifische Einstellungen werden entweder über ein kleines Menue am Tracker oder über die Web-Oberfläche des Trackers vorgenommen. Einstellungen werden im NVRAM (früher EEPROM) permanent abgespeichert.
Der Tracker verfügt über WLAN Interface und kann als Access-Point oder in bestehenden WLANs betrieben werden.
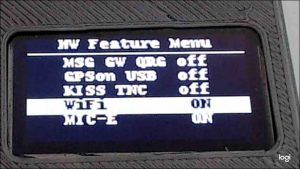
Zur Zeit implementiert:
- APRS Tracker
- Anzeige GPS Daten/Kompass
- Anzeige BME Sensor Daten (wenn vorhanden)
- RX/TX Daten
- Maidenhead Locator
- WebInterface
- FW-Update über Webinterface
- FW Update auf Letzversion über Tracker direkt ( im Menue Setup->Update FW) (ab FW 1.50)
- Deep-Sleep Mode ( äusserst geringer Stromverbrauch zwichen den Aussendungen – nur ca 1mA ! )
- APRS Messages (ab FW 1.47 ohne ack)
- remote Steuerung über IO Expander Modul (ab FW 1.47)
in Vorbereitung (oder experimental):
- KISS TNC über TCP
- Gateway-Mode: Peter’s (OE5BPA) APRS-IS Lib wurde implementiert. Die Tracker lassen sich auf Gateway-Betrieb umschalten. Konfig über Web. (ab FW 1.65 )
Konfiguration:
Vor der ersten Inbetriebnahme muss der Tracker konfiguriert werden. Dies kann über das kleine Menue am Display oder das Web-Interface (bei aktivem WiFi) geschehen.
User-spezifische Einstellungen werden im NVRAM (EPROM) abgespeichert und bei jedem Restart, Power-ON oder Erwachen aus dem ‚Deep Sleep Mode‘ von dort geladen.
Nach Änderung von Einstellungen oder Features über das Tracker Menü bitte diese über „Save to EPROM/NVRAM“ permanent abspeichern. Bei Konfiguration über Web-Interface werden Einstellungen automatisch im NVRAM gespeichert.

Konfiguration über ‚Setup‘ (User-spezifische Daten) und ‚Feature‘
Textfelder können über die drei Tasten editiert werden. <Enter> meist mittlere Taste, Cursor links und rechts.
Mit <Enter> kann zwischen Buchstaben-Eingabemodus (letzte Zeile: A-Z) auf Cursor-Positionierung ( <- -> ) umgeschaltet werden. Wenn fertig, einfach mit Cursor-Tasten nach links oder rechts rausfahren. Es erscheint dann die Bestätigung ….
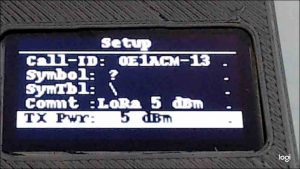
So wie das Call & ID können auch andere Parameter editiert werden:
- APRS Symbol (def ? )
- Symbol Table ( def \ alternate Symbol Table )
- Comment
- TX Power ( def 5: 0 dBmW – kann auf 23: 18 dbmW geändert werden )
- TX Frequency ( fix zugeteilt, nicht änderbar 433,775 )
- RX Frequency ( fix zugeteilt, nicht änderbar 433,900 für späteren Message txfer vom GW)
- TX Interval (def 60 Sec – kann bis auf 600 Sec geändert werden )
WLAN Setup
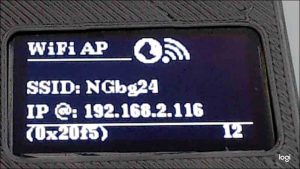
Bei neuen, nicht konfigurierten Trackern startet der WIFI Stack automatisch und wird am WLAN als ACCESS-Point mit dem Namen „LoRaxxxxxx (letzte 3 Bytes der MAC Addresse) sichtbar, mit dem man sich verbinden kann.
Das WLAN Password für den ACCESS Point ist „lora12345“ .
Nachdem WLAN verbunden wurde, lässt sich unter der Addresse 192.168.4.1 der kleine Webserver des Trackers aufrufen.
Konfiguration über ‚Setup‘ (User-spezifische Daten) und ‚Feature‘ WEB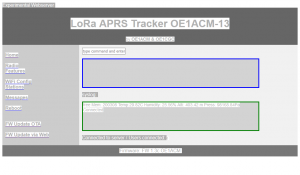
Der Tracker wird im AccessPoint Mode betrieben und hat keine Verbindung zum public Internet. Es wird empfohlen, um auch das ‚automatische FW-Update Feature‘ nutzen zu können, den Tracker in ein bestehendes WLAN zu connecten. – Dazu bitte unter ‚WIFI Config‘ die SSID und das Passwort eintragen und „SAVE„.
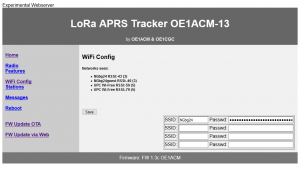
Beim nächsten Reboot des Trackers verbindet er sich mit dem ersten definierten (SSID & Password) WLAN.
Die IP-Addresse wird über DHCP bezogen und wird am Display des Trackers gemeinsam mit der SSID des WLANs angezeigt.
Firmware Update
Nachdem der Tracker in ein bestehendes WLAN engebunden wurde und somit auch unsere WEB-Seite http://www.lora-aprs.at erreicht, kann der automatische Firmware Update unter Angabe einer FW-Versionsnummer ( aktuell 161 = Version 1.61) gestartet werden.
![]()
FW-Version 1.61 ( Web Download Versionsnummer 161)(12/May/20)(Tracker D,ADS,1Watt)
FW-Version 1.50 ( Web Download Versionsnummer 150) ( 9/Jul/19) (Tracker D,ADS,1Watt)
FW-Version 1.47 ( Web Download Versionsnummer 147) ( 12/Jun/19)
FW-Version 1.4 ( Web Download Versionsnummer 14)
FW-Version 1.3c ( Web Download Versionsnummer 4)
Der Tracker holt sich dann selbständig die FW vom WebServer und installiert diese. Die Grüne LED blinkt während des FW-Downloads und es wird ein Neustart mit aktualisierter FW durchgeführt.
Alte FW und Konfiguration bleiben soweit als möglich erhalten. Das automatische FW-Update ist ab Version 1.3 möglich. Frühere Versionen können über USB upgedated werden.
Bitte bei Trackern ohne USB darauf achten, dass die FW vor dem Einbau auf das ESP32 Wroom Modul geflushed wurde. Weitere Updates können dann (ab V 1.3) über das WebInterface erfolgen. Neben dem Web-Update kann auch noch über OTA oder Seriell aus der Entwichlungsumgebung oder Update-Tool die FW upgedated werden. (GPS sollte bei USB-Updates abgesteckt sein – Achtung Kabel am Mini-Stecker dabei nicht beschädigen!)
Tracker mit fix verbautem ESP32 modul (ADS/A/1Watt) müssen vor dem Einbau geflushed werden und können später über WiFi upgedated werden.
FW-Version 1.61 ( Web Download Versionsnummer 161)(12/May/20)
Update ab FW1.30 über Web (FW Update via Web) oder am Tracker direkt (Menue Setup->FW_Update) ab FW1.50 (Netzwerkverbindung zu unserem Server www.lora-aprs.at über WiFi wird benötigt)
FW-Version 1.50 ( Web Download Versionsnummer 150) (9/Jul/19)
oder im Binary-Format (Installation per USB oder Programmer über Flashdownload Tool )
Display 1.3″: ESP32_TTGO_disp13_v1_50.ino Display 0.96″: ESP32_TTGO_disp96_v1_50.ino.
FW-Version 1.47 ( Web Download Versionsnummer 147)
FW-Version 1.4 ( Web Download Versionsnummer 14)
FW-Version 1.3c ( Web Download Versionsnummer 4)
Ältere Versionen:
https://www.dropbox.com/sh/y57khr30abvrq9q/AACTDqYsbJfsp7hpstL1tMY-a?dl=0